- Ensure you go into Settings and set your flight simulator version and directory.
- Ensure you have run the Sim Scenery Update.
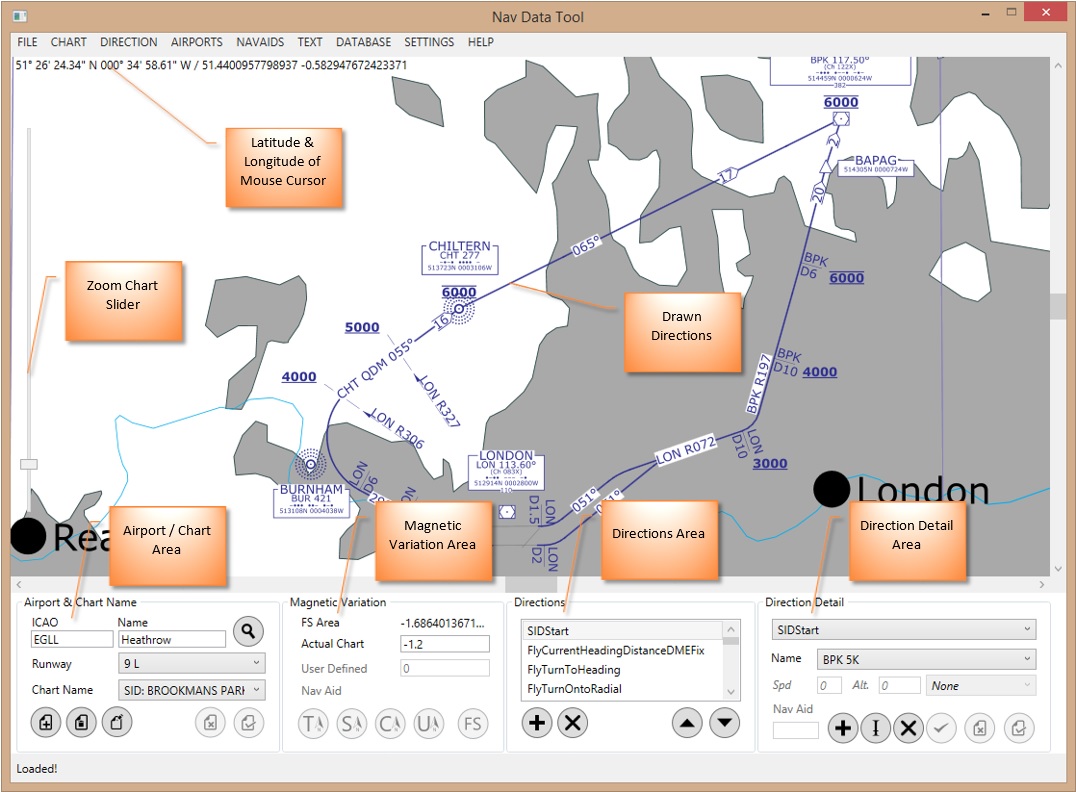
- In the Airport / Chart Area, either enter the ICAO identifier or the airport Name to display a map zoomed onto the airport selected. If nothing happens click the Find Airport button and if still nothing happens, the airport cannot be found.
- You can zoom in and out of the map using the mouse wheel or the Zoom Chart Slider.
- You can click and drag to the move the map.
- Locate the charts for the airport concerned. These can be found on the internet, in professional flight planning software or in some flight simulator scenery user guides.
- Choose a chart to create. If this is the first time using the software, choose a STAR as these tend to be very simple.
- Click the Add Chart button and then enter the Chart Name. You can call it anything you wish, however its probably best to use the original chart name so you can tie the chart back to its source.
- In the Magnetic Variation Area, enter the magnetic variation shown on the chart into Actual Chart. If there is no chart magnetic variation available, leave it as 0 until it becomes obvious that chart magnetic headings are being shown incorrectly. You can then guess what the chart mag var is and enter it. Negative values are for West, positive for East.
- Examine your chart to see if any VOR's are used. If so, you will need to update the slaved magnetic variation for them as all data sources are usually out of date. Read Calculate Slaved Mag Var for more information. Note if the VOR will be used with a simple Direction such as FlyToNavAid you do not need to update the slaved magnetic variation as radial bearings will not be referenced.
- Examine your chart for a suitable procedure start point if there is no textual description of the steps for each procedure. E.g. for a SID it will be the runway, for a STAR it will be a nav aid.
- The intention is to break down each procedure into a number of steps called Directions.
- To create a Direction, in the Directions Area, click the Add Direction button. The Direction Detail area will now be enabled and allows you to enter details for your newly created Direction. Read What Are Directions? for more information.
- When entering Nav Aid identifiers into the Direction, they sometimes will not be found (the Magnetic Variation Area buttons will all be disabled). You can add missing Nav Aids. Read Add a Custom Nav Aid for more information.
- After entering a valid Nav Aid identifier into a Direction you can optionally change what magnetic variation type and value is used. Read Magnetic Variation Options for more information.
- Once the Direction Detail has been added, click the Save Current Direction button. The chart will be updated to reflect the Direction. The Nav Data Tool takes a best endeavours approach to achieving what you have entered into the Direction. This can result in the chart looking odd such as drawing a circle then drawing a line in the opposite direction. If this happens it will be due to one of the following (in most likely order first):
- Incorrect data added;
- Try ticking/unticking Recip/Altn;
- Incorrect Direction type chosen;
- Incorrect slaved magnetic variation;
- Incorrect Actual Chart magnetic variation;
- Incorrect data on the actual chart;
- Possibly a bug;
- If you need to adjust any of the labels please read Labels for more information. Note Directions can also be set so that they are not actually drawn on the chart. This is useful for overlapping flight paths of different procedures. Please read What Are Directions? for more information.
- Keep adding Directions until the procedure is complete. You can then start adding Directions for the remaining procedures until the chart is complete.
- You can now repeat from step 5 until all the charts are added. Remember to save your work regularly.
- To create the Nav Data for your new charts, choose FILE and then Generate NavData. This will display a window listing which aircraft and software to output the Nav Data. Tick these as required. Tick All Charts if you want all the charts for the airport to be used, un-tick if you just wish to generate NavData for the current visible chart. Click Generate and wait for it to Complete!
- You will now need to check that the produced Nav Data is correct. You can read Testing Nav Data - PMDG NGX for more information.
- If you are struggling creating Directions, examine one of the examples!
