Most of the commonly reported issues and questions are answered in the Frequently Asked Questions (FAQ) option under the Support menu of this website.
*** PLEASE NOTE ***
Your forum account is not the same as the account used in the shop. They are completely separate accounts.
Your forum account is not the same as the account used in the shop. They are completely separate accounts.
1st December: A new version of the GoFlight Interface Tool for MSFS is now available.
12th November: A new version of the GoFlight Interface Tool for X-Plane is now available.
6th June: A new version of Virtual Flight Sim Hardware is now available (huge update)
21st November: A new version of the GoFlight Interface Tool for FSX/FSXSE/P3D is now available.
GF46 for X-Plane 11 Working!

I've successfully programmed the GF46 Transponder. I haven't tried any of the other possibilities but I'm sure they'll follow very similar steps.
I'm using Windows 10.
1. Make sure that power management is turned OFF for all the USB devices on your computer. If you don't do this you're going to have problems that can't be resolved no matter how hard you try.
2. I have all my GF modules (GF-T8-2, GF-166, GF-46, GF MCO Pro, Track IR and CH Eclipse Yoke) plugged in to the same USB Hub. Also, my USB Hub is a version 3.0. So, version of the hub is likely not a problem despite what GoFlight says.
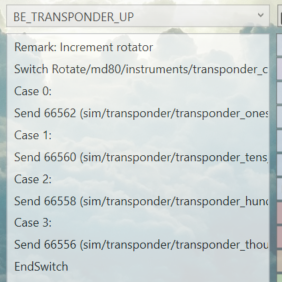
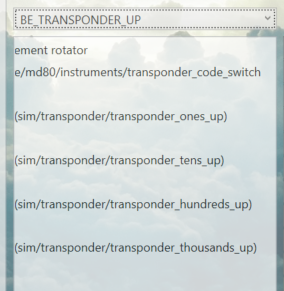
3. I created custom BESPOKE events for all 4 rotary dial directions. That's clockwise and counter clockwise for both PUSHED and NON-PUSHED. (see attached XML files).
4. In GIT, on the 46O tab, select the device from the 1st dropdown, select "ENABLED" from the 2nd dropdown, and select "1" from the 3rd dropdown. The last step is likely going to change depending on how many options you want to implement on your GF46. In my case I only needed one so that I can have a transponder.
5. In GIT, on the 46O tab, there are 8 "Option" buttons. Click the 1st one. Type "SQWK", "XSPR", "TRAN" or whatever 4 letter acronym you choose in the "Function Name" text box. In the "Display Data" dropdown you MUST select something that is indicative of the transponder code you'd see in your simulator. For me using the Rotate MD-80 aircraft that particular variable (dataref) is "sim/cockpit2/radios/actuators/transponder_code". Given that this variable doesn't seem to be vendor-specific I'm going to assume you can use this for any aircraft.

6. In GIT, on the 46R tab, select the "Device" from the dropdown. Likely you'll only see 1 unless you have more than one GF46.
7. In GIT, on the 46R tab, click the 1st "Option" button under the "Rotary" section. This needs to be the same "Option", as you selected on the 46O tab. In other words if you selected the 1st option on 46O you need to select the 1st option on 46R. Under the "Functions" sub-section you are going to have to select a rotary event, both clockwise and counter-clockwise, for the "Non-pushed" and "Pushed" rotary actions. This is where I spent the bulk of my time. You're going to need to discover what actions in the simulator cause each of the 4 numbers of the transponder to increase/decrease.
For step 7 above you're likely going to need to download the "DataRef plug-in" to X-Plane. It'll be a great tool, in combination with the GIT Detective, so figure out what variables (DataRefs) are affected by mouse clicks, etc. in the simulator. Don't get frustrated as it'll take a bit of time to figure out how one variable changing can affect others. In some cases I realized that I had to simulate "Sending" a message to the simulator whereas in other cases I only had to change the value of a variable (DataRef). I'm assuming this will be a similar scenario for most aircraft. Regardless, you can make selections, click parts of the cockpit, etc. and see those changes reflect on DataRefs listed in the plug-in dialog. Those DataRef names in the plug-in exactly match the same variables in the GIT Detective.
You'll download the plug-in at xsquawkbox.net/xpsdk/mediawiki/DataRefEditor
Here are screenshots of selections and the options I used for my BESPOKE events.
46R tab options
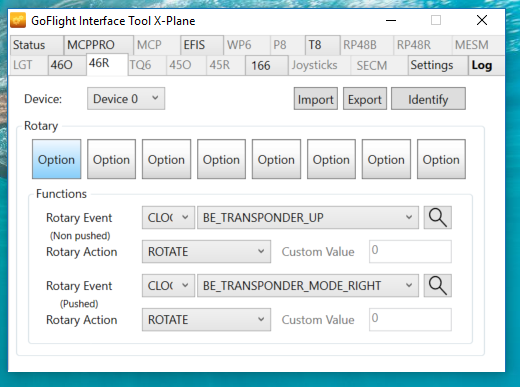
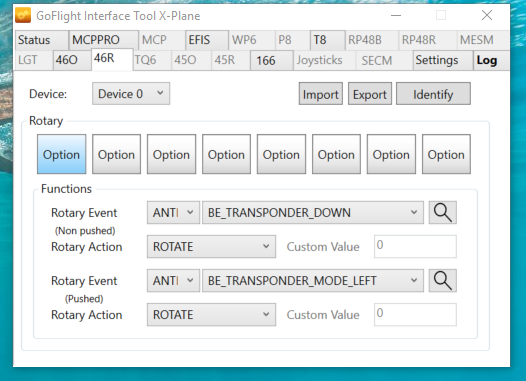
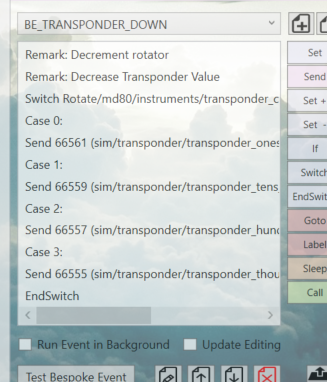
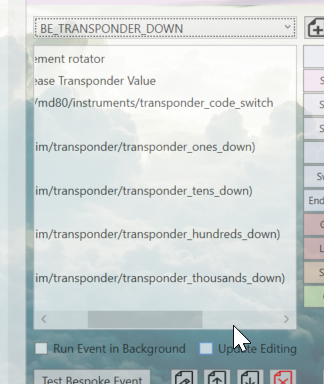
Up/Down transponder numbers
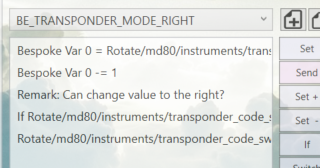
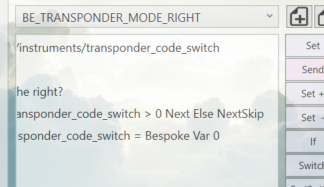
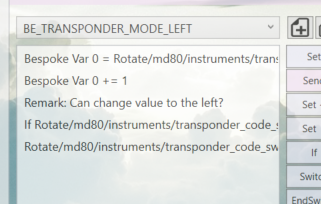
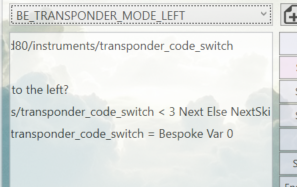
Left/Right transponder modes
Lastly, close the detective and click "Restart" in the GIT. Somehow, until I did this my physical interaction with GF46 didn't do anything.
I'm using Windows 10.
1. Make sure that power management is turned OFF for all the USB devices on your computer. If you don't do this you're going to have problems that can't be resolved no matter how hard you try.
2. I have all my GF modules (GF-T8-2, GF-166, GF-46, GF MCO Pro, Track IR and CH Eclipse Yoke) plugged in to the same USB Hub. Also, my USB Hub is a version 3.0. So, version of the hub is likely not a problem despite what GoFlight says.
3. I created custom BESPOKE events for all 4 rotary dial directions. That's clockwise and counter clockwise for both PUSHED and NON-PUSHED. (see attached XML files).
4. In GIT, on the 46O tab, select the device from the 1st dropdown, select "ENABLED" from the 2nd dropdown, and select "1" from the 3rd dropdown. The last step is likely going to change depending on how many options you want to implement on your GF46. In my case I only needed one so that I can have a transponder.
5. In GIT, on the 46O tab, there are 8 "Option" buttons. Click the 1st one. Type "SQWK", "XSPR", "TRAN" or whatever 4 letter acronym you choose in the "Function Name" text box. In the "Display Data" dropdown you MUST select something that is indicative of the transponder code you'd see in your simulator. For me using the Rotate MD-80 aircraft that particular variable (dataref) is "sim/cockpit2/radios/actuators/transponder_code". Given that this variable doesn't seem to be vendor-specific I'm going to assume you can use this for any aircraft.
6. In GIT, on the 46R tab, select the "Device" from the dropdown. Likely you'll only see 1 unless you have more than one GF46.
7. In GIT, on the 46R tab, click the 1st "Option" button under the "Rotary" section. This needs to be the same "Option", as you selected on the 46O tab. In other words if you selected the 1st option on 46O you need to select the 1st option on 46R. Under the "Functions" sub-section you are going to have to select a rotary event, both clockwise and counter-clockwise, for the "Non-pushed" and "Pushed" rotary actions. This is where I spent the bulk of my time. You're going to need to discover what actions in the simulator cause each of the 4 numbers of the transponder to increase/decrease.
For step 7 above you're likely going to need to download the "DataRef plug-in" to X-Plane. It'll be a great tool, in combination with the GIT Detective, so figure out what variables (DataRefs) are affected by mouse clicks, etc. in the simulator. Don't get frustrated as it'll take a bit of time to figure out how one variable changing can affect others. In some cases I realized that I had to simulate "Sending" a message to the simulator whereas in other cases I only had to change the value of a variable (DataRef). I'm assuming this will be a similar scenario for most aircraft. Regardless, you can make selections, click parts of the cockpit, etc. and see those changes reflect on DataRefs listed in the plug-in dialog. Those DataRef names in the plug-in exactly match the same variables in the GIT Detective.
You'll download the plug-in at xsquawkbox.net/xpsdk/mediawiki/DataRefEditor
Here are screenshots of selections and the options I used for my BESPOKE events.
46R tab options
Up/Down transponder numbers
Left/Right transponder modes
Lastly, close the detective and click "Restart" in the GIT. Somehow, until I did this my physical interaction with GF46 didn't do anything.
Chris - GoFlight and X-Plane 11.
Tagged:
Comments
To search for a specific item you can select the tab you want to search on. I.e. "Custom" is going to show a list of variables or events (depending on which section you want to search) and then type some text and click "enter" on the keyboard or mouse click the "binoculars" button to the right of the search text. This text is NOT case sensitive. The results are shown on the search results tab (far right).
If you see nothing, than nothing was found. It's going to be a hassle, no doubt. But once you understand how the variables and events affect your custom BESPOKE events it starts to become a little fun. I found that it's a good idea to copy your search text over to notepad because there are going to be plenty of times where you need to search back/forth between different sections and it becomes timely to try to remember what you typed beforehand.
In the middle right of the GIT Detective you can view and search on events. Although you can likely do more than just send the event to X-Plane I've only used these events to specifically do that. If I'm building a custom BESPOKE event and want to send the message that a user flipped a switch in the cockpit there is potentially an event associated with that action. In that case I'm going to find that event, highlight it and click the "Send" button in the BESPOKE designer (bottom right of the GIT Detective dialog). I've combined "Send" events and variable (DataRef) value changes within one BESPOKE event to accomplish several things at the same. I.e. turning on landing lights, panel lights and the beacon light all at the same time.
I'm going to work on some small demos and upload them to YouTube this weekend. Hopefully I can provide something useful to people who were just as lost as I was when I started configuring these devices.
Good luck.
Chris
Far Superior IMHO.
https://github.com/leecbaker/datareftool
Anyone know where I can find the GoFlight SDK? I can program X-Plane with their SDK but having no luck at all with finding a way to interface with GoFlight. I've been a professional software developer for 25 years and would be surprised that this is too difficult (the comms between the 2). The GoFlight hardware may still be problematic but I'd love to give it a try.