Most of the commonly reported issues and questions are answered in the Frequently Asked Questions (FAQ) option under the Support menu of this website.
*** PLEASE NOTE ***
Your forum account is not the same as the account used in the shop. They are completely separate accounts.
Your forum account is not the same as the account used in the shop. They are completely separate accounts.
1st December: A new version of the GoFlight Interface Tool for MSFS is now available.
12th November: A new version of the GoFlight Interface Tool for X-Plane is now available.
6th June: A new version of Virtual Flight Sim Hardware is now available (huge update)
21st November: A new version of the GoFlight Interface Tool for FSX/FSXSE/P3D is now available.
GF-166 programming

Hello I have a problem to configure the GF-166 in the MSFS2020 for my purpose.
I want the middle button to switch between standby and active
The left button to switch between NAV1 and NAV2
The right button to toggle between Com1 and Com2.
I was able to do this configuration with the original Goflight (FSX) software without any problems.
I ask you to give me the assignments. It does not work with the programmed buttons NAV, COM and ADF. I am desperate.
Best regards, Peter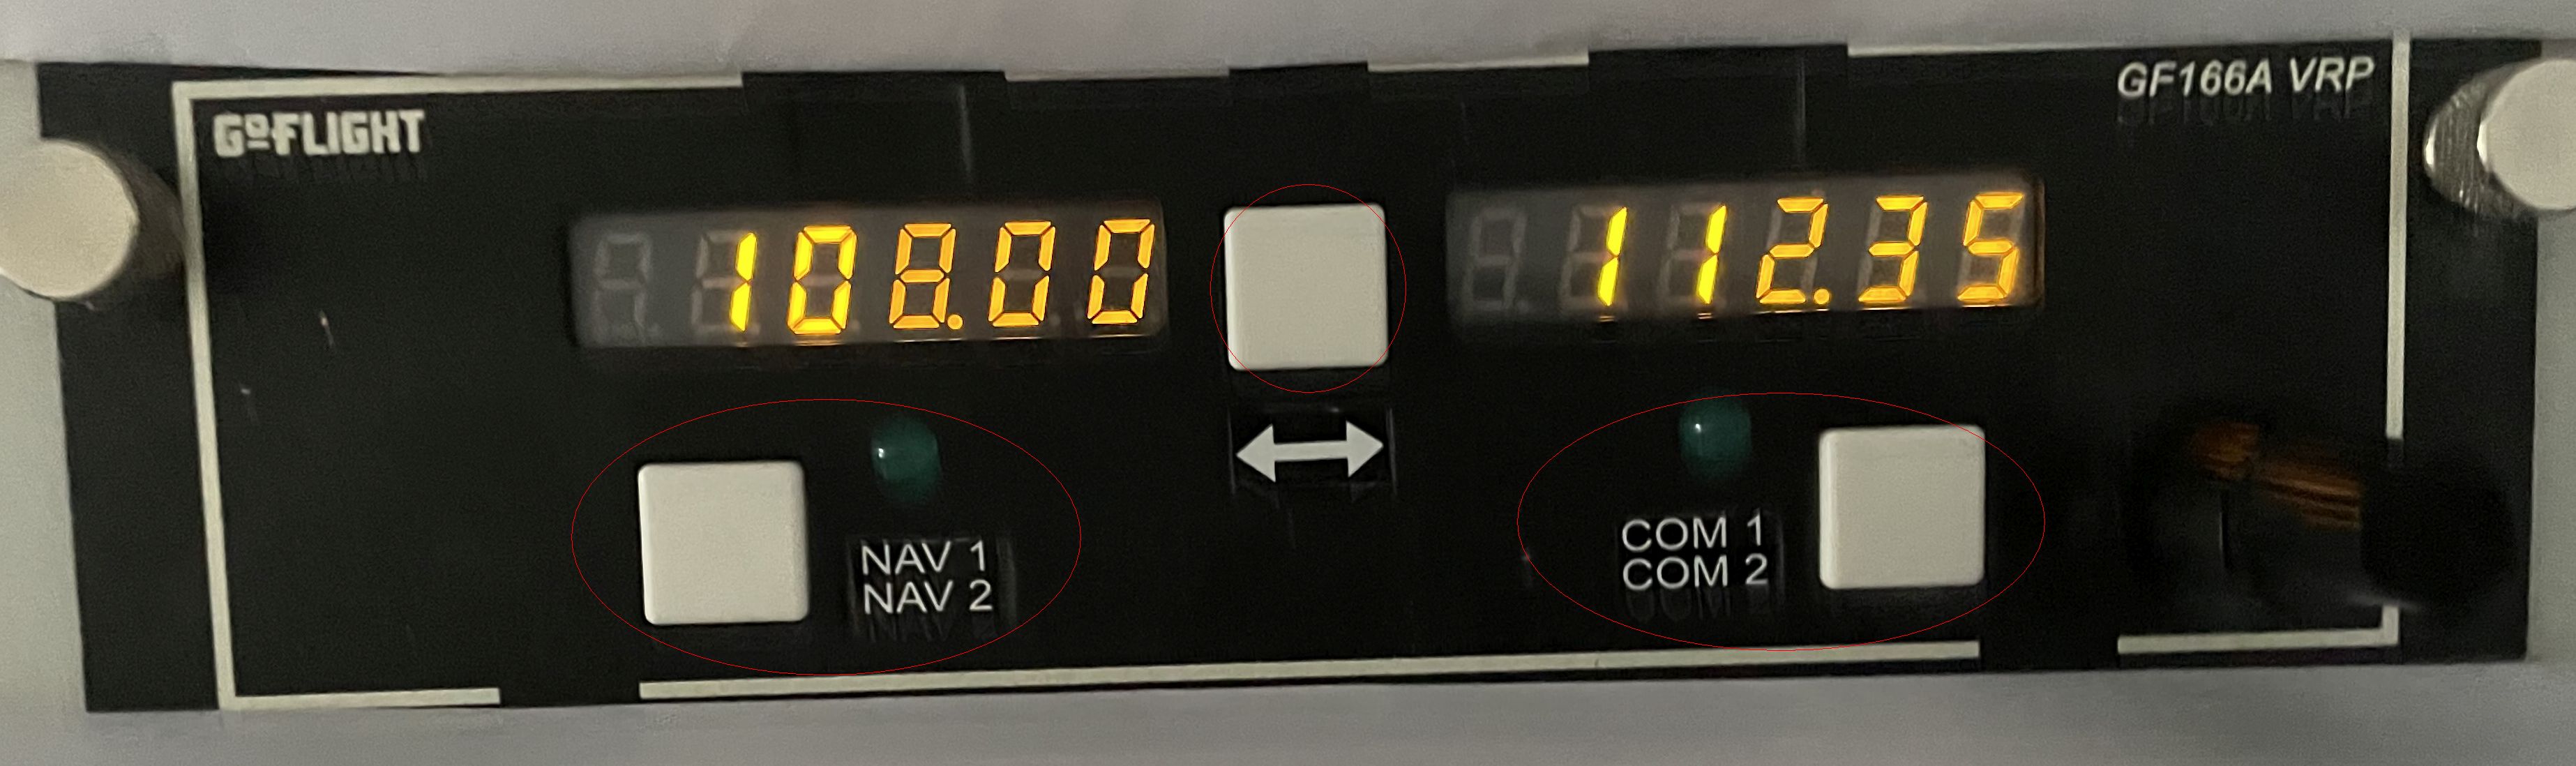
Comments
best regards Peter
Best wishes
Steve
Peter
I have had the same problem when I first switch on without GIT my GF166 seems to work ok then when I load GIT the dials seem ok until I press the buttons then the module just freezes and I cant get it to work. I have it assigned in the Goflight config tool, coms 1&2 in the right side also I tried it with the same on the left also Nav1&2 on the left with the same result. I have checked the Git settings and I don't have a clue what to set the dials to. Have you had any luck yet.
Kind Regards
Bill
No, it doesn't work for me either. I've tried everything. Unfortunately I don't get any support from Pollypot. They don't take the problem seriously.
With kind regards
Peter
I also have two newer GF166's that are the newer gray color. They both work fine. Just throwing it out there. Could this be an issue?
I notice also that the black modules are GF166A whilst i have the grey as you do but they are marked GF166 no A I don't no if that matters, I have tried all I know with the GF166 which is not a lot as I'm not that up on computer's. I have 9 modules and the MCPPRO which work perfect I just cannot understand why I cant get this new purchase (GF166) to work. Sometimes the lights on the 166 identify when I press the tab on the GIT config but sometimes they don't really strange.
Best wishes
Steve
Wir warten immer noch auf deine Problemlösung.
Grüsse Peter
Dave
Best wishes
Steve
Your tip is of absolutely no use.
My concern is very simple.
The left button must switch between NAV1 and NAV2
The right button must switch between COM1 and COM2
The middle button must switch from standby to active.
It shouldn't be that complicated. It worked in the earlier versions.
best regards Peter
Is there really no solution to the GF166A problem. Please let me know the settings. I would be very grateful.
Best regards
Peter
Build each config and use the commands mentioned in the above article to switch between the configs.
If you examine the default settings (when clicking COM or NAV button), you can see an example of them in use when you examine the events for each config on the buttons.
Best wishes
Steve
Your instructions and tips are absolutely useless. Maybe it's because of the translation from English to German. (I'm Swiss) It's all much too complicated. Is it so difficult for you to send me 3 print screens of the programming of the 3 buttons. Button centre, button left and right.
You could bring great joy to a 72 year old simulator fan.
Thank you and greetings from Switzerland
Peter
1 - NAV1
2 - NAV2
3 - COM1
4 - COM2
Since the left, right and centre buttons need different assignments depending on which mode you're on, you will need 12 different button assignments (3 x 4) to make this work. Have a look at the attached pdf. I've taken screenshots of all the control assignments you need for each button.
The rotaries have to be assigned as below. Bear in mind you need 2 settings per rotary (clockwise and anticlockwise):
Clockwise assignments
ROTARY_UNPRESSED1 -> NAV1_RADIO_WHOLE_INC
ROTARY_PRESSED1 -> NAV1_RADIO_FRACT_INC
ROTARY_UNPRESSED2 -> NAV2_RADIO_WHOLE_INC
ROTARY_PRESSED2 -> NAV2_RADIO_FRACT_INC
ROTARY_UNPRESSED3 -> COM_RADIO_WHOLE_INC
ROTARY_PRESSED3 -> COM_RADIO_FRACT_INC
ROTARY_UNPRESSED4 -> NAV1_RADIO_WHOLE_INC
ROTARY_PRESSED4 -> COM2_RADIO_FRACT_INC
Anticlockwise assignments
ROTARY_UNPRESSED1 -> NAV1_RADIO_WHOLE_DEC
ROTARY_PRESSED1 -> NAV1_RADIO_FRACT_DEC
ROTARY_UNPRESSED2 -> NAV2_RADIO_WHOLE_DEC
ROTARY_PRESSED2 -> NAV2_RADIO_FRACT_DEC
ROTARY_UNPRESSED3 -> COM_RADIO_WHOLE_DEC
ROTARY_PRESSED3 -> COM_RADIO_FRACT_DEC
ROTARY_UNPRESSED4 -> NAV1_RADIO_WHOLE_DEC
ROTARY_PRESSED4 -> COM2_RADIO_FRACT_DEC
Then you need to configure the displays:
DISPLAY_LEFT1 -> NAV_ACTIVE_FREQUENCY1
DISPLAY_RIGHT1 -> NAV_STANDBY_FREQUENCY1
DISPLAY_LEFT2 -> NAV_ACTIVE_FREQUENCY2
DISPLAY_RIGHT2 -> NAV_STANDBY_FREQUENCY2
DISPLAY_LEFT3 -> COM_ACTIVE_FREQUENCY1
DISPLAY_RIGHT3 -> COM_STANDBY_FREQUENCY1
DISPLAY_LEFT4 -> COM_ACTIVE_FREQUENCY2
DISPLAY_RIGHT4 -> COM_STANDBY_FREQUENCY2
See attached a separate pdf with a couple of examples on how to make these assignments for the rotaries and displays.
As you can see it's a bit tedious to set up, but once you configure it, you can export the config and use it on most standard aircraft.
Hope this helps!
Carlos
First of all, thank you very much for your work. I tried to program the GF-166 according to your instructions. Part works. But there is still an error somewhere, but I can't find it. Would it be possible to send me your GF166-0.xml via email? I know this is a big request. I'm really thankful to you for that as I'm not progressing anymore.
My email address: peter.leonhard50@gmail.com
regards
Peter
Cheers,
Carlos
Your configuration works fine. Now I have a payware aircraft Carenado C182 Skyline in which the altitude GF-MPC cannot be adjusted. The display lights up but the rotary button has no effect. I've tried a lot but without success. I hope you have good advice for me.
Many thanks Peter
this post is old but I'll try your settings
thanks a lot
Roland